
Successful 3D printer calibration is the fundamental bridge that takes your production quality from “good” to “perfect.” While most enthusiasts focus on temperature, mastering Pressure Advance is the true secret to professional-grade results. This guide serves as a vital technical extension of our 3D Printing Guide Review and complements our deep-dive into Precision 3D Printer Calibration.
What is Pressure Advance in 3D Printing?
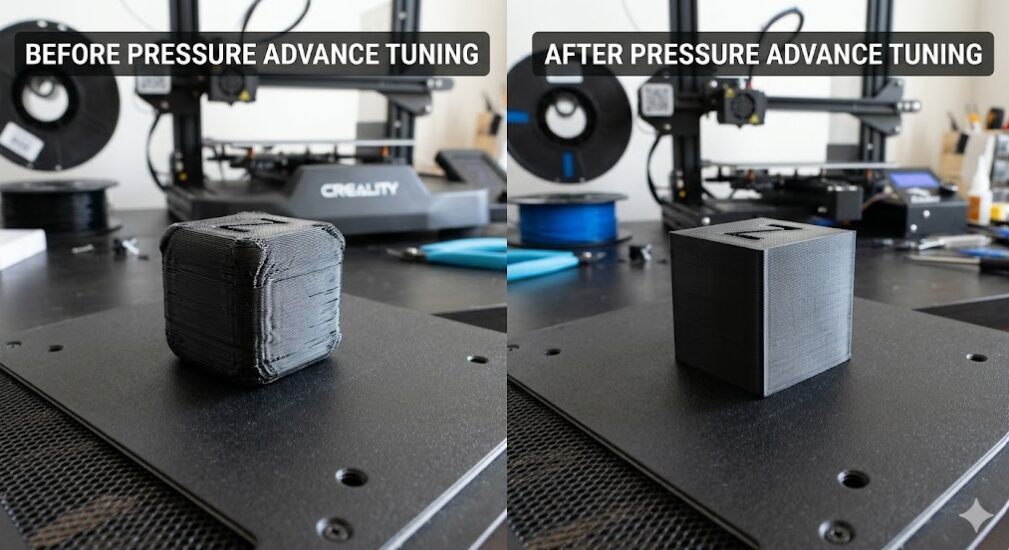
Pressure Advance (known as Linear Advance in Marlin firmware) is a predictive technology that manages the internal pressure of the hotend. Because 3D printing filament is slightly elastic, the extruder often pushes too much plastic during deceleration and too little during acceleration. This phenomenon causes bulging corners and uneven surfaces.
Consequently, by implementing a specific K-factor, your printer can compensate for this elasticity. As a result, you will achieve:
- Sharp, precise 90-degree corners without dimensional inaccuracies.
- Significant reduction in stringing and zits on the print surface.
- Consistent extrusion width even during high-speed printing maneuvers.
Extruder Comparison and K-Value Ranges
The physical distance between your extruder gears and the nozzle drastically changes your required settings. Because of this, you must identify your hardware type before beginning the tuning process.
| Extruder Type | Typical K-Value Range | Mechanical Reason | Recommended Upgrade |
|---|---|---|---|
| Direct Drive | 0.02 – 0.08 | Short path means less filament compression and lag. | View Direct Drive Kits |
| Bowden Tube | 0.40 – 1.0+ | The long tube acts like a spring, requiring more lead. | Premium PTFE Tubing |
How to Calibrate Pressure Advance (Step-by-Step)
In order to find the sweet spot for your specific roll of plastic, follow this structured guide.
Step 1: Generate a Calibration Pattern
First, use a generator to create a series of test lines. These lines should print at two different speeds—typically 20mm/s and 100mm/s. Furthermore, ensure your bed is perfectly leveled before starting.
Step 2: Analyze the Printed Lines
Next, examine the points where the speed transitions. If the line is thick at the end of the fast section, your K-value is too low. Conversely, if the line thins out or leaves a gap, your K-value is too high.
Step 3: Apply the K-Factor to Firmware
Finally, once you identify the cleanest line, save that K-value into your slicer or printer start G-code. For instance, using the command SET_PRESSURE_ADVANCE ADVANCE=0.05 in Klipper or M900 K0.05 in Marlin.
Why Material Choice Matters
In addition to hardware, the material itself dictates your pressure settings. For example, PLA filament is relatively rigid and requires a lower K-factor. However, flexible TPU acts like a rubber band inside the extruder and requires a much higher value to prevent massive blobs at the end of every line.
Moreover, even different brands of the same material can behave differently. Therefore, running a quick calibration suite for every new brand-color combination is the only reliable method to eliminate post-processing time.
Pressure Advance Frequently Asked Questions (FAQ)
Does Pressure Advance reduce print time?
Actually, it does not directly speed up the motors, but it allows you to print at higher speeds while maintaining quality. This approach saves you both time and material by preventing total print failures.
Can I use Pressure Advance with a 0.6mm nozzle?
Yes, in fact, larger nozzles often benefit even more from pressure tuning because they move a higher volume of plastic, which creates more internal pressure lag.
Is Linear Advance the same thing?
Specifically, yes. Linear Advance is the terminology used by Marlin firmware, while Pressure Advance is the term used by Klipper. Both achieve the same goal of flow compensation.
Conclusion
Ultimately, mastering Pressure Advance is the bridge between a hobbyist output and a professional part. By investing 20 minutes into this calibration, you ensure your 3D printer delivers crisp details and structurally sound layers every time.
Related Calibration Guides:
- Precision 3D Printer Calibration: Learn to master temperature towers and retraction tests.
- 3D Printing Guide Review: Explore our ultimate pillar post for full setup optimization.

Recent Comments